Europe Travel Photo Tips – How to Adjust Camera White Balance Setting?
London weather changes as fast as women mind. 🙂 Don’t be surprise if you see bright sunshine minutes after a heavy downpour, and it rains again when you are still posing for a photo shot! This rapid change of weather and sunlight had restricted photo opportunities in London. Especially when you have limited time at one tourist spot and the sudden rain will surely ruin your photo session.
During my travel to London recently, we had 4 days visiting London. Out of that 4 day period, 1st evening was raining. The whole 2nd day was a cloudy and rainy day. We were lucky to have some bright sunlight on 3rd day but still cloudy. The 4th day was perfect but we were leaving in the morning. Basically the London sky during the period was overcast with thick cloud. How did I capture nice photos of London’s attractions then? White Balance (WB) is the answer.
Now is the 2nd question. How could we adjust the WB of our digital camera? WB exists only in digital camera. Digital camera converts analogue lights into digital colour. Different colours are being calculated digitally based on the white point the image sensor received. However, white will appear too yellowish under halogen and too bluish under fluorescent due to their different colour temperature from different light source. This is when the WB setting of our camera comes in. WB is a feature of digital camera to adjust its white point colour temperature to adopt the different ambient lighting so you can see the actual colour of the scene. Auto WB setting is the camera technology to adjust its colour temperature automatically to adopt different ambient lightings. However, AWB doesn’t always correct.
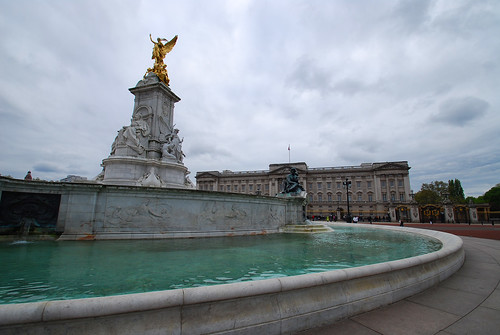
When the sky is overcast with thick clouds, the colour temperature is much lower than expected. In this case, AWB would adjust White point of the scene to a much higher colur temperature and the image will appear bluish than what is seen by our eyes. Take a look at the above travel photo which I took on the 2nd day of my London visit. It is supposed to be an attractive shot of the Victoria Memorial with Buckingham Palace as background. But the overcast weather had actually ruined the image with dull colour.
Firstly, the image is still slightly under exposed eventhough I had increased the Exposure Value by +1/3 stop. 2ndly, WB is out. This problem happened to many of my London travel photos. As I mentioned above, the rapid change of weather had made selecting WB of my D60 difficult. Switching to Daylight preset WB may be perfect for one shot but may not be for the next if the weather changed.

The same problem happened if we thought of selecting Cloudy preset WB for this scene but the complex ambient light from the overcast sky and pool water reflection had fooled the Nikon WB sensor and the image appeared to be much yellow than actual, as shown in the above photo. But some may prefer it as it shows warmer and more dramatic colours!
For these kind of weather in your travel destination, the best WB setting I would prefer is still be the AWB, if you are shooting JPEGs (If you are shooting RAW, forget about the WB setting as you can select the destined colour temperature at a later stage). Set WB setting to AWB and shoot all the way! Leave the colour correction at a later stage by adjusting colour temperature of the image with either CS5 or Lightroom 3, to whatever colour temperature you prefer…

The above photo is the result of what I adjusted during post processing with Photoshop. By increasing the brightness and reducing the colour temperature, this was actually what I’ve seen for the Victoria Memorial of London, with also an increase in colour saturation.
Conclusions? WB setting is critical for photo shooting under one fixed ambient lighting, like studio or museum shooting. Pre-set your camera WB will easily produce a set of perfectly coloured photos collection that is ready for printing direct from camera. However, if you are shooting outdoor travel scenes, especially in a travel destination that have fast changing weather, like London in Spring, switch your camera WB setting to AutoWB. It would be easier and safer to shoot using AWB to get good result for most of the photos. Then play around the slider of Photoshop to adjust the image colour temperature, to what you prefer, not necessarily to what you’ve seen in actual. And this is the most useful purpose of adjusting White Balance. 🙂 – Travel Feeder, your ultimate travel photo blog.
About The Author
Cecil Lee
The author is an avid traveler and photography hobbyist who loves to share with others his travel and photo-taking experience in many popular tourist destinations around Europe, Asia and Australasia. Read the exciting stories with many photos captured on his journeys.


In the end, setting the WB will be based on personal preference. Everyone has a different idea of what the colours of a photo should look like. Many who shoot Raw probably don’t change the WB from AWB, while others like to get it as correct in the camera as possible.
For sunny days that have cloudy periods, I tend to keep the setting on Cloudy WB because I like the warmer tones it gives under both conditions. Once again, it is a personal taste.
- August 10, 2010